Archive for the 'Kids & Schedules' Category

Organized for Student Success, Part 5: Organize Their Space

An Organized Student is a More Successful Student

As your student(s) begin their new school year, take the opportunity to work with them in organizing their bedroom and clothing. Use the same basic steps outlined in Organizing a Study Area, in my previous post; Organized for Success, Part 4: Organize the Student .

  • Think through how you want your space to look and function
  • Empty out drawers, clothes and any bins that are storing clothing
  • Group like things together. Create sub categories such as Underclothes, Sports Clothes, Uniforms, School Clothes, Dress Clothes etc.
  • Toss old or worn clothes and donate outgrown, seldom worn, or out of style clothes. The biggest pitfall is keeping more clothes than you actually can use or have room for. Be realistic in what you are keeping.
  • Return the keep pile to the space and think through what, if any, storage accessories or containers you may need. Assign a specific space for each sub category of clothing.
  • Store often used clothing close at hand, while utilizing harder to reach space for seldom used items. Store off-season clothes in a clearly labeled bin or under-the-bed container.
  • Be careful not to over-stuff drawers and closets. You will go a long way in helping your child stay organized by actually providing a space for all of their belongings and then making it both easy and accessible to put them away.
  • Make use of storage space, which is often overlooked, such as the backs of doors or inside of closets to mount hooks, racks, or pockets. Use hooks for storage

    Beautiful and Functional Possibilities by The Container Store

    of everyday items such as sweatshirts, pajamas, robes, and towels. If your child doesn’t have many hanging clothes, install shelves in half of their closet for additional folded clothes or for toy storage.

Now that you know what your child owns and what needs they may have, you can still take advantage of summer clearance sales.

Happy (and Organized!) School Year!

Cheryl

Be sure to check out all of the articles in the Organized for Student Success Series;  Part 1: Saving on Supplies Part 2: The College Years, Part 3: The Traveling Student, Part 4: Organize the Student and Part 6:  Organize Their School Memories.

Organized for Student Success, Part 4: Organize the Student

An Organized Student is a More Successful Student

Give the students in your home every advantage by working with them to develop excellent organizational skills.

Organize Time and School Work

Help your student(s) develop a plan to organize their time. Most students will receive an agenda book. Hold your student(s) accountable to using it. Help them develop good habits. It takes approximately 21 days of constant repetition to form a new habit. Offer them grace, as you encourage them in forming this new habit. It will help them succeed as a student and they will learn valuable lessons of time management for the future.

Teach them organizing skills as you work with them to set aside specific places in their binder, notebook, or folders for homework, current work, and completed work. Many teachers will share their suggestions for organization with you and your students. Take advantage of their wisdom and experience. Finally, consider creating a file box at home to store completed work, filed by subject. When their binder or folders begin to bulge, they will have an easy and convenient place to file their work away, while still having quick access to it for future needs.

Organize a Study Area

A Functional Work Space from PBteen

Create an area in your home specifically for doing homework. This area should be will lit and quiet, with a work area and a supportive chair. It is also helpful to have storage for basic study helps and school supplies. This is the perfect time to inventory all your school and office supplies while reorganizing the area for ease of use. This is an easy process, which includes a few simple steps:

  • Think through how you want your space to look and function
  • Empty out any drawers, cabinets, bins or files that are storing office and/or school supplies
  • Group like things together. Create sub categories such as; Art Supplies, Paper Supplies, Pens and Pencils, Notebooks and Binders, Office Supplies etc.
  • Toss or donate any damages or obsolete supplies
  • Return the “keep” pile to the space and think through what, if any, storage accessories or containers you many need
  • Finally, store often used supplies close at hand, while utilizing harder to reach space for seldom used supplies

Happy (and Organized) School Days!

Cheryl

Be sure to check out all of the articles in the Organized for Student Success Series;  Part 1: Saving on Supplies, Part 2: The College Years, Part 3: The Traveling Student, Part 5:  Organize Their Space, and Part 6:  Organize Their School Memories.

The Keeper of Memories

“There is no childhood home to return to for holidays or long weekends. My mother long ago packed my bedroom items into a box marked,”Amy” ,and brought it to me in Birmingham. Letters from old boyfriends, photos from school dances, moody poems I wrote at 13-I keep them safe. I am the caretaker of my own past.”
Excerpt taken from “Going Home Again” By Amy Bickers Mercer,
Southern Living Magazine, April 2008

As another year of school comes to a close, memories of the past year are piling up. What are we to do with all the photographs, certificates and memorabilia each year?

Parents, you are the caretaker of your child’s past. How do you accomplish this without being overtaken and overwhelmed by mounds and mounds of memories, which when out of control, become clutter rather than keepsakes?

The answer really is simple: You save the BEST and the MOST special keepsakes, photos and memorabilia. If you save everything, it diminishes the value of those SPECIAL items. They will get lost in the shuffle, and you will be left with clutter, not keepsakes!

We tend to start out strong, with the first many pages of the baby book (for the 1st child, at least!) filled out completely. But then, life takes over and we might pile papers in the back of the book for a rainy day. The rainy day becomes the rainy years, and before we know it, our children are ready to launch out on their own, and if we are lucky, we have boxes of memories, which may or may not be clutter, to pass along to them.

So, how can we reign in the clutter and sort through the toys, books, clothes, artwork, school work, and photos? Will we, like Amy’s mother, be able to pass along a wonderful, handpicked history of our child’s development and memories?

First, think LONG TERM and SIMPLE.

Think through the categories or stages of your child’s life.

To document the life of a child, consider the following categories or stages; Baby, Preschool age, School Age, and High School. You will want to develop a system of saving memories for each category of your child’s life.

Finally, consider how YOU operate, and plan accordingly.

Next develop a system of saving memories for each category based on your own personality. Are you a detail oriented person who will actually fill in the blank spaces in the baby book, and the school memory keepsake? Lovely! Then simply set aside a few minutes each week or month, depending on your child’s age and rate of development, and do it! You know yourself and your life. If you are not someone who has time, energy or motivation to fill in those blank spaces in the memory books, then come up with a plan that will work for you. You can choose to use a calendar to record the milestones of your child’s development along with cute and funny sayings and incidents. You can hang the calendar in whatever room you spend a significant amount of time, so that it is often accessible and you can record your child’s milestones on the run, as they occur.

An alternative is to simply set aside a photo box, clearly labeled with your child’s name and, using dividers that come with the photo box, simply slip in the memories you jot down, photos and memorabilia in chronological order. Look how simple it can be!

The same system can be used to record the preschool years.

As your child approaches school age, consider purchasing a file box with 12 dividers or a banker’s box with 12 large envelopes. Then as each year slips by, keep a plastic or cardboard crate accessible and toss in all your child’s potential treasures……….., all the sweet cards, pictures, awards and brilliant writings. At the end of each school year, sort through and save the best and most meaningful. Then transfer them to the appropriate file or envelope. By the end of high school you’ll have a wonderful, handpicked history of your child’s life and development (with very little effort).

To borrow a phrase from Nike, “Just do it”! You’ll be glad you did (and so will your child)!

Happy Summer and Happy Memories!

Cheryl

Your Children………..Organized??

Oh yes, our children, organized!

Children. The very word can conjure up images of chaos and disorganization. Don’t get me wrong. I absolutely love children. I have 4 of them (who are all on their way to adulthood), and they have blessed my life beyond description. But, I also love order in my life. Can the two, children and order, dwell in the same home and life. You betcha!

You have an opportunity to learn how in Tuesday’s upcoming workshop!

Your Children, Organized!

Is your home overwhelmed with the overflow of  your child’s belongings? Come learn how to clear the clutter, reign in and organize the present and cherish the past. Learn how to set up a childhood memory box, create a school and art archive for each child, and learn creative ways to displaying and storing art work. We will also cover tips on reigning in and organizing clothing and toys.

When: Tuesday, November 9th, 10-11:30 AM

Where: Robert Moton Center, 300 S. Center Street, Westminster

Cost: $15

Sign Up Today! Call Carroll County Parks and Recreation at 410-386-2103 or Click Here for online registration

Happy (and organized!) Days!

Cheryl


Organized for Student Success, Part 4: Organize Their Space

An Organized Student is a More Successful Student

As your student(s) gets ready for a new year of school, take the opportunity to work with them in organizing his/her bedroom and clothing. Use the same basic steps outlined in Organizing a Study Area, in my previous post; Organized for Success, Part 3: Organize the Student .

  • Think through how you want your space to look and function
  • Empty out drawers, clothes and any bins that are storing clothing
  • Group like things together. Create sub categories such as Underclothes, Sports Clothes, Uniforms, School Clothes, Dress Clothes etc.
  • Toss old or worn clothes and donate outgrown, seldom worn, or out of style clothes. The biggest pitfall is keeping more clothes than you actually can use or have room for. Be realistic in what you are keeping.
  • Return the “keep” pile to the space and think through what, if any, storage accessories or containers you may need. Assign a specific space for each sub category of clothing.
  • Store often used clothing close at hand, while utilizing harder to reach space for seldom used items. Store off-season clothes in a clearly labeled bin or under-the-bed container.
  • Be careful not to over-stuff drawers and closets. You will go a long way in helping your child stay organized by actually providing a space for all of their belongings and then making it both easy and accessible to put them away.
  • Make use of storage space, which is often overlooked, such as the backs of doors or inside of closets to mount hooks, racks, or pockets. Use hooks for storage

    Beatiful and Functional Possibilities by The Container Store

    of everyday items such as sweatshirts, pajamas, robes, and towels. If your child doesn’t have many hanging clothes, install shelves in half of their closet for additional folded clothes or for toy storage.

Now that you know what your child owns and what needs they may have, you can still take advantage of summer clearance sales.

Happy (and Organized!) School Year!

Cheryl

Be sure to check out all of the articles in the Organized for Student Success Series;  Part 1: The College Years, Part 2: The Traveling Student, Part 3: Organize the Student, and Part 5:  Organize Their School Memories.

Organized for Student Success, Part 3: Organize the Student

An Organized Student is a More Successful Student

Give the students in your home every advantage by working with them to develop excellent organizational skills.

Organize Time and School Work

Help your student(s) develop a plan to organize their time. Most students will receive an agenda book. Hold your student(s) accountable to using it. Help them develop good habits. It takes approximately 21 days of constant repetition to form a new habit. Offer them grace, as you encourage them in forming this new habit. It will help them succeed as a student and they will learn valuable lessons of time management for the future.

Teach them organizing skills as you work with them to set aside specific places in their binder, notebook, or folders for homework, current work, and completed work. Many teachers will share their suggestions for organization with you and your students. Take advantage of their wisdom and experience. Finally, consider creating a file box at home to store completed work, filed by subject. When their binder or folders begin to bulge, they will have an easy and convenient place to file their work away, while still having quick access to it for future needs.

Organize a Study Area

Create an area in your home specifically for doing homework. This area should be will lit and quiet, with a work area and a supportive chair. It is also helpful to have storage for basic study helps and school supplies. This is the perfect time to inventory all your school and office supplies while reorganizing the area for ease of use. This is an easy process, which includes a few simple steps:

  • Think through how you want your space to look and function

    An Organized Space by PB teen

  • Empty out any drawers, cabinets, bins or files that are storing office and/or school supplies
  • Group like things together. Create sub categories such as; Art Supplies, Paper Supplies, Pens and Pencils, Notebooks and Binders, Office Supplies etc.
  • Toss or donate any damages or obsolete supplies
  • Return the “keep” pile to the space and think through what, if any, storage accessories or containers you many need
  • Finally, store often used supplies close at hand, while utilizing harder to reach space for seldom used supplies

Happy (and Organized) School Days!

Cheryl

Be sure to check out all of the articles in the Organized for Student Success Series;  Part 1: The College Years, Part 2: The Traveling Student, Part 4:  Organize Their Space, and Part 5:  Organize Their School Memories.

The Keeper of Memories

20 Years of Memories, Organized & On my Desk!

“There is no childhood home to return to for holidays or long weekends. My mother long ago packed my bedroom items into a box marked,”Amy” ,and brought it to me in Birmingham. Letters from old boyfriends, photos from school dances, moody poems I wrote at 13-I keep them safe. I am the caretaker of my own past.”
Excerpt taken from “Going Home Again” By Amy Bickers Mercer, Southern Living Magazine, April 2008

Parents, you are the caretaker of your child’s past. How do you accomplish this without being overtaken and overwhelmed by mounds and mounds of memories, which when out of control, become clutter rather than keepsakes?

The answer really is simple: You save the BEST and the MOST special keepsakes, photos and memorabilia. If you save everything, it diminishes the value of those SPECIAL items. They will get lost in the shuffle, and you will be left with clutter, not keepsakes!

We tend to start out strong, with the first many pages of the baby book (for the 1st child, at least!) filled out completely. But then, life takes over and we might pile papers in the back of the book for a rainy day. The rainy day becomes the rainy years, and before we know it, our children are ready to launch out on their own, and if we are lucky, we have boxes of memories, which may or may not be clutter, to pass along to them.

So, how can we reign in the clutter and sort through the toys, books, clothes, artwork, school work, and photos? Will we be able to pass along a wonderful, handpicked history of our child’s development, accomplishments and memories?

You certainly can, and quite easily, if you follow some simple steps:

1. First, think LONG TERM and SIMPLE.

20 Years of Memories

2. Think through the categories or stages of your child’s life.

To document the life of a child, consider the following categories or stages; Baby, Preschool age, School Age, and High School. You will want to develop a system of saving memories for each category of your child’s life.

My Daughter's Memory Box

This is my daughter’s memory box, in  which you will find a favorite baby blanket, a few special books, her baby book and photo album, precious outfits, her apron, cook book and tea set which we used often when she was little.

3. Consider how YOU operate, and plan accordingly.

Are you a detail oriented person who will actually fill in the blank spaces in the baby book? Lovely! Then simply set aside a few minutes each week or month, depending on your child’s age and rate of development, and do it! You know yourself and your life. If you are not someone who has time, energy or motivation to fill in those blank spaces in the baby book, then come up with a plan that will work for you. You can choose to use a calendar to record the milestones of your child’s development along with cute and funny sayings and incidents. You can then hang the calendar in whatever room you spend a significant amount of time, so that it is often accessible and you can record your child’s milestones on the run, as they occur. An alternative is to simply set aside a photo box or memory box, clearly labeled with your child’s name and, using dividers that come with the box, simply slip in the memories you jot down, photos, and memorabilia in chronological order. Look how simple it can be!

The same system can be used to record the preschool years, school age and high school years.

13 Years of School Treasures

4. Create a Simple System to Save Your Child’s School Work and Accomplishments

As your child approaches school age, consider purchasing a file box with 12 dividers or a banker’s box with 12 large envelopes. Then as each year slips by, keep a plastic or cardboard crate accessible and toss in all your child’s potential treasures……….., all the sweet cards, pictures, awards and brilliant writings. At the end of each school year, sort through and save the best and most meaningful. Then transfer them to the appropriate file or envelope. By the end of high school you’ll have a wonderful, handpicked history of your child’s life and development (with very little effort).

To borrow a phrase from Nike, “Just do it”! You’ll be glad you did (and so will your child)!

Happy (and Organized!) Memories!

Cheryl

The Inept Scrapbooker and 13 Years of Memories

My Daughter's Photo Gallery and Scrapbook

5 Simple Steps to Organize & Document Those Precious Memories….

Graduation Day is upon us, once again. Two of our 4 children graduated from high school 2 years ago, and this month our middle son will begin the next step of his journey. This is a bittersweet time in our lives. Sweet, as we look back over their accomplishments and individual growth through the years and see the fine young men and young woman they have become. And sweet, knowing we have done all that we could have to prepare them for this next stage of life. Life away from home. Bitter (actually not bitter, just a bit sad), as they will all 3 be in different parts of the country.

How quickly I forget how crazy busy the senior year of high school is! The last few weeks of the school year include prom, college prep, senior capstone service projects, end of year banquets and celebrations, wrapping up sports seasons, and of course, graduation.

In the midst of it all, I complete a memory book for each of our graduates, spanning their 13 years of school, along with a photo gallery frame with sweet memories of their high school years, to be on display at their graduation party, and to pass on as gifts for the graduates.

This task is a joy, not a burden, in large part because I have taken a few simple steps to collect and document their memories and accomplishments over the years.

Of all the organizing projects we might undertake, tackling photos and memories can be the most overwhelming. But, on the other hand, it can provide the biggest payoff in terms of joy, satisfaction and freedom. Our photos simplify life by providing memories without having to keep all the stuff associated with those memories.

It doesn’t have to be an overwhelming process, if you follow these simple steps:

1. Keep only the best!

If you hold on to EVERY photo and piece of memorabilia, the volume becomes overwhelming and you won’t be able to enjoy any of them. The idea is to pick the most special, organize them beautifully, and toss the rest. That way, you can actually access and enjoy your memories.

2. Contain The MemoriesPurchase a scrapbook, photo album or memory box for each child

Be realistic. You know yourself. Don’t start something that you won’t keep up with. If you know you won’t finish a scrapbook, then don’t start it, as it will only bring you stress, not joy. If a scrapbook isn’t your thing, then purchase a simple photo album or memory box. Keep in mind that it will need to accommodate 13 years of photos and memories, but remember– only THE BEST!

When each of my children began kindergarten, I started a school age scrapbook for them. I intentionally purchased spiral bound scrapbooks, which limited the number of pages that I had to fill for each of their years of school. Basically, I had a bout 5 pages per year. Not so overwhelming for this inept scrapbooker!

3. Gather The Memories – Each year, place an envelope in the back of your photo album or scrapbook and begin to gather photos and memorabilia of that year.

As each school year began, I simply put a manila folder in the back of each of my child’s scrapbooks to gather pictures of that year. As I had pictures developed during the year, I would get an extra copy of the best that I had for each child, and simply slip them into their envelope.

4. Edit The Memories – At the end of each year sort through and pick out THE VERY BEST (toss the rest……yes, toss the rest- or give to Grandma!)

By the end of the school year, I had gathered highlights of each child’s year, which generally included their first day of school,  highlights of the year, special activities and sports, holidays and summer fun. I then choose the best, most memorable, and most meaningful to incorporate into their memory book.

5. Organize The Memories -Beautifully and Simply

Finally, I spent a few hours arranging the photos and memories that I had collected for each child into their scrapbook. Despite my ineptitude as a scrapbooker I enjoyed these hours. It was a time to reminisce and review each child’s year. I don’t try to tell a story on each page, as a seasoned scrapbooker may. Instead, I simply mount the best pictures that I had for that year, along with a a few colorful die cuts, photo-safe stickers, card-stock and a few captions or funny sayings.
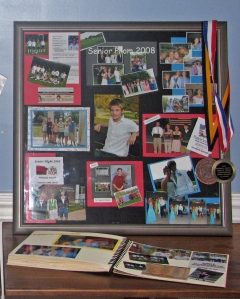
Matt's Photo Gallery and Scrapbook

My Son's Photo Gallery and Scrapbook

As my children head off to college, this inept scrapbooker is thrilled to have a picture story to remember the past, as I look forward to their exciting years to come.

Times have changed, and over the years, so have my photo habits. Even this old girl has gone digital, ordering and storing pictures online. Many people now create their scrapbooks completely online. The entire process has been simplified, making it easier for us to be the keeper of memories.

Happy (and Organized!) Days!

Cheryl

P.S. Congratulations Graduates!

The Revolving Door, Part 1 The College Years

Getting (and Staying!) Organized During the College Years

Graduations, Another Year of College Completed, Mission trips, Summer camp, A new job, A new town, …………each resulting in “The Revolving Door”, as young adults move in and out of our homes.

The Revolving Door:  “characterized by a frequent succession or a cycle of leaving and returning.” Merriam Webster Dictionary

As in college students returning home for the summer!

Moving Back Home.........

College students often return home for the summer with more stuff than could have possibly fit into their little dorm room or apartment! Their last days at school are consumed with finals, friends, and hopefully, a little fun, and they usually aren’t too concerned with neatly packing their belongings for the summer. Oftentimes, their belongings are shoved into bags, bins, and crates in a hit or miss manner (and that’s on a good day!). So, how do you keep it (your home, your life, your car) organized in the midst of the revolving door?

Don’t allow them to dump! Gently remind them that this is your home, not a storage facility. Then, offer simple, easy, and effective solutions to storing away their college gear until the next semester.

Dorm and Apartment Supplies, School Supplies and Gear

Pack away these supplies in clearly labeled, clear plastic bins. Sort like with like. Only then, can they see what they have, and decide what to keep. Next, ask a few questions about each item, before packing it away:

  • Did you use this item last semester?
  • Do you foresee a need for it next semester?
  • Where would you like to donate items that aren’t needed/used?
  • This is the perfect opportunity to assess any needs for next semester.

College Textbooks

  • If they won’t be needed in the future, require them to sell back their textbooks. This will result in less clutter, and can be a deposit for next semester’s books.
  • If you missed selling textbooks back to the college bookstore, check out these easy solutions.

Unopened Foods, Any Toiletries, Cleaning Supplies, and Laundry Detergent

Incorporate all foods (opened and unopened), any toiletries, cleaning supplies and laundry detergents into your household. Then they can start new and fresh next semester.

Clothing

Encourage them to take a few extra minutes to sort and purge before they unpack and/or pack away their clothes. Begin by taking a hard look at the clothes they did not bring to college. Generally, these are clothes they don’t like or don’t wear as often, and it just may be time to donate. Next sort like with like. Then ask the following questions to help your student sort and purge before storing away:

  • Did you wear it this semester/year/season? If you didn’t wear it last semester or season, you probably won’t wear it during the next semester or season!
  • Does it fit? If not, is it within a reasonable number of size ranges of your current size?
  • Do you love it? Is it still in style? Is it YOUR style?
  • Is the item in good condition? Does it have stains or tears or is it too worn?
  • Does it need mending? If so, will it realistically be mended?
  • How many do you currently own of this type of item? How many do you realistically wear or need?
  • Where would you like to donate the clothes you haven’t worn? Carroll County friends, check out this Renew, Reuse, Recycle link to some local possibilities.

Before storing away clothes, be sure to take the 3 simple steps of clothing storage, Clean, Contain, and Repel to protect them. Read more at a previous blog post,  “The Great Exchange”.

Linens and Bedding

Use the same 3 simple steps of clothing storage; Clean, Contain, and Repel, and store linens to be used next semester in a clearly labeled container. Incorporate any other linens into your household, or donate to a worthy cause.

Microwave and Refrigerator

Clean out the microwave and refrigerator, and any other appliances, before storing them away for next semester.

Before packing away the crates and bins of clothing and supplies, be sure that everything is clearly labeled. A few of my favorite labels are:

Not only will you be taking steps to keep your home organized, just as important, you will be helping your student(s) learn and practice organizational skills, that they will use for a lifetime.

Happy (and Organized) Moving!

Cheryl

Organized for Success – How are YOUR Students Managing?

Organize the Student

An organized student is a more successful student. Give the students in your home every advantage by working with them in developing excellent organizational skills. Help your student(s) develop a plan to organize their time and their papers. Most students receive an agenda book. Hold your student(s) accountable to using it. Help them get into a good habit. It takes approximately 21 days of constant repetition to form a new habit. Offer them grace as you encourage them in forming this new habit. It will help them succeed as a student and they will learn valuable lessons of time management for the future. Teach them organizing skills as you work with them to set aside specific places in their binder, notebook, or folders for homework, current work and completed work. Many teachers will share their suggestions with you and your student. Take advantage of their teacher’s wisdom. Also, consider creating a file box at home to store completed work, filed by subject. When their binder begins to bulge, they will have an easy and convenient place to file their work away, while still having quick access to it for future needs.

Organize the Study Area

Next, prepare a study area and take stock of your school and office supplies.

Beadboard Basic Corner Desk from Pottery Barn Teen

Beadboard Basic Corner Desk from Pottery Barn Teen

Create an area in your home specifically for doing homework. This area should be well lit and quiet with a work area and a supportive chair. It is also helpful to have storage for basic study helps and school supplies.  This is the perfect time to inventory all your school and office supplies while reorganizing the area for ease of use. This is an easy process, which includes a few simple steps:

  • Think through how you want your space to look and function
  • Empty out any drawers, cabinets, bins or files that are storing office and/or school supplies
  • Group like things together. Create sub categories such as Art Supplies, Paper Supplies, Pens and Pencils, Notebooks and Binders, Office Supplies, Computer Supplies etc……..
  • Toss or donate any damaged or obsolete supplies
  • Return the “keep” pile to the space and think through what, if any, storage accessories or containers you may need
  • Store often used supplies close at hand, while utilizing harder to reach space for seldom used supplies

Organize a School Memory Box

The Bungalow File Holder from See Jane Work

The Bungalow File Holder from See Jane Work

If you haven’t done so already, consider creating a School Memory Box for each child. This can be as simple as a plastic file box or a cardboard banker’s box divided into 12 sections. During the school year file away any artwork, projects, special memories, creative writing and awards. Then, at the end of each school year, go through your file box of completed work and pull out the best and most meaningful of their creative writing, schoolwork and artwork. Finally,  simply file it away in their School Memory Box in the appropriate year. By the end of high school, you’ll have a wonderful, handpicked history of your child’s development and accomplishments, with very little effort.

Check out these stylish Bungalow File Holders from See Jane Work. They come in 5 different designs and hold standard hanging files. They are chic enough to set out on a bookshelf, desk top or kitchen shelf, adding flair to your home and organization to your life.

Organize the Room

This is also the perfect time to work with your child organizing his/her bedroom and clothing. Use the same basic steps outlined earlier:

  • Think through how you want your space to look and function
  • Empty out drawers, clothes and any bins that are storing clothing
  • Group like things together. Create sub categories such as Underclothes, Sports Clothes, Uniforms, School Clothes, Dress Clothes etc.
  • Toss old or worn clothes and donate outgrown, seldom worn, or out of style clothes. The biggest pitfall is keeping more clothes than you actually can use or have room for. Be realistic in what you are keeping.
  • Return the “keep” pile to the space and think through what, if any, storage accessories or containers you may need. Assign a specific space for each sub category of clothing.
  • Store often used clothing close at hand, while utilizing harder to reach space for seldom used items. Store off season clothes in a clearly labeled bin or under-the-bed container.
  • Be careful not to over-stuff drawers and closets. You will go a long way in helping your child stay organized by actually providing a space for all of their belongings and then making it both easy and accessible to put them away.
  • Make use of storage space, which is often overlooked, such as the backs of doors or inside of closets to mount hooks, racks, or pockets. Use hooks for storage of everyday items such as sweatshirts, pajamas, robes, and towels. If your child doesn’t have many hanging clothes, install shelves in half of their closet for additional folded clothes or for toy storage.

Now that you know what your child owns and what needs they may have, you may still be able to take advantage of summer clearance sales.

Have a Fantastic (and organized!) School Year!

Cheryl

inorderforlife small


Follow inorderforlife on Twitter

Visit In Order for Life's Facebook Fan Page!

Click here to check it out!

NEW Home Learning Parties!

Organizing Just Got Fun!
Now Scheduling Home Learning Parties for Summer 2011
Gather your friends, choose a topic, learn, simplify AND earn free and half priced products from the Clever Container Company! To schedule your party, call Cheryl at 410-259-1466 or email cheryl@inorderforlife.com

My Favorite Things

Click here for my collection of favorites links for organizing products and other useful sites.

Reuse, Renew, and Recycle

Click here for useful tips and information to assist you in being environmentally friendly!

Proud Member of:

National Association of Professional Organizers